Photo by Ken Mitchell

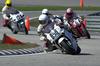
Paul leads the pack into 1A.
Photo by Ken Mitchell
 Back To Thumbnails |
This is image 1 of 37. BACK TO GALLERY LIST BACK TO THUMBNAILS |
 Paul in turn 1A again, a few laps later, still eading the pack! Photo by Ken Mitchell |